UI Component Listing And Not registered handle in Magento2

Today I created a new listing for a custom module, but unfortunately all what I got was the error message below.

After digging around for few minutes I noticed the above handler was actually missing in the di.xml file. I simply added the following collections argument and re-compiled the code.

All good!

The requested component (“settings”) is not found. Before using, you must add the implementation.

I tried to implement a simple field validation for a checkbox Apply Special Price which I needed on the Catalog > Product > Edit page. Unfortunately my first attempt below didn’t work and broke the whole grid table.

Here is how I have defined the field apply_special_price in category_form.xml based on different stackoverflow posts.

As I said, it didn’t work at all. So, I kept researching and found a solution which allowed me to implement the validation rule without the nodes <settings> and <formElements> inside of <field>.

Basically, everything has to be defined inside of config otherwise the XML for your custom UI component will be invalid. The section validation allows you to define filters for pretty much every use case. The example below sets a field as mandatory and detects white spaces. Beside that it will make sure the value matches a specific regex pattern.

More validation options are available out-of-the-box.

Update composer.lock without updating code

Recently I had to fix a broken composer.lock but without actually updating code. I have found the composer option ” nothing ” which updates the composer.lock file only.

Once the command ran successfully, you should see a line ” Writing lock file ” in the output.

If you have issues with dependencies you can update the composer.lock file with –ignore-platform-reqs.

How to Install and Setup Beeketing in Magento2

Beeketing is a marketing automation platform that helps to increase conversion rate and boost revenue in Magento automatically. Beeketing offers a bunch of apps which you can easily enabled via Magento backend. Here is how you can get started with Beeketing.

Go to your Magento2 document root and install Beeketing without updating other packages.

Wait until the packages beeketing/magento-common and beeketing/magento-beeketing and are installed.

After that re-compile your code and clear all caches. Here is how I usually do it.

Once the module is installed and enabled, you will see a new menu item BEEKETING in the Magento admin panel sidebar. On this page you have to connect Beeketing with your Magento store. Click on LET’S CONNECT and follow the instructions.

Beeketing Setup

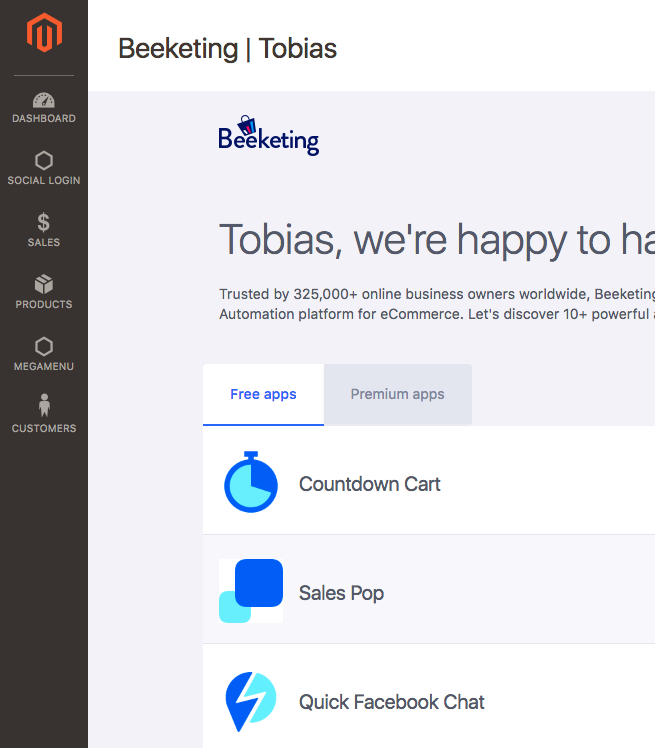
In the next step you have to Sign Up or Login with your existing Beeketing account. Once you are connected, you should see a list of Free and Premium apps, which you can enable via Install app.

Beeketing Setup

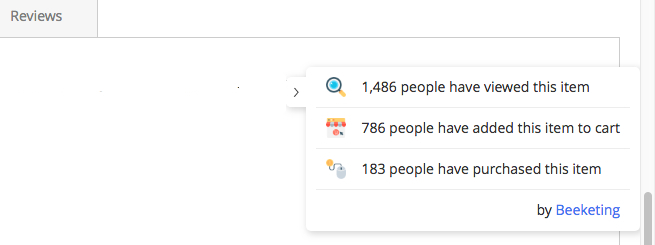
As soon as a app is enabled, you should see the changes in the front-end right away.

Beeketing Setup

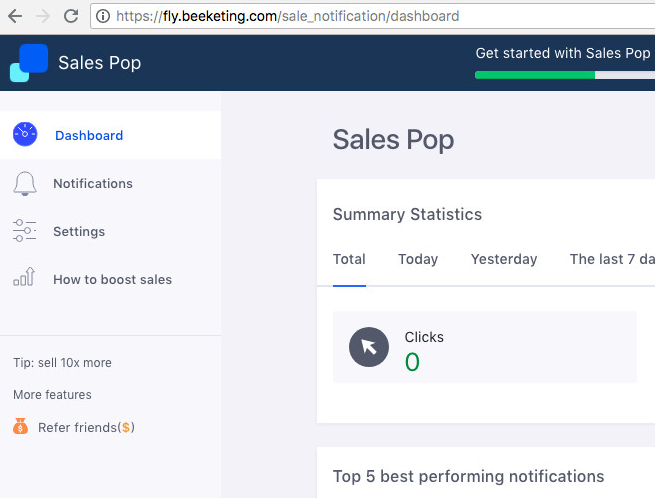
Settings and statistics for each app can be found in the Beeketing dashboard.

Beeketing Setup

From here I recommend you to checkout http://support.beeketing.com/support/solutions and read how to configure these apps.

Display the MinPrice / MaxPrice of each collection in Shopify

Here is a simple liquid code you can use in your collection-grid-item.liquid to display the MinPrice or MaxPrice on your /collections page. First you have to assign a sorted product collection. For example: priceMinMax

After that you can use priceMinMax as follows.

In order to display the maximum price of the collection, use the liquid code below.

In both cases it is necessary to use the money filter.

Missing required argument $name of Xtento\ProductExport\Logger\Logger.

If you are using Xtento in combination with an automated product importer, you may have seen the following error before.

The error message appears right after saving a product. The reason is that, at least one of your products in Products > Catalog has no Name. To fix this, you can update the name manually via MySQL queries or simply delete the products and import again correctly.

Bulk Update Customizable Product Options in Magento2

Today I had to bulk-update the Price and Max Characters in the tab Customizable Options for hundreds of simple products based on the title.

Magento2 Customizable Product Option

I knew that it could be done programmatically but I figured out that it can be done just by updating the table catalog_product_option and catalog_product_option_price. First I got a comma separated list of option_id’s based on a specific title.

With the comma separated list I was able to update the value of the Price and Max Characters as follows.

1. Price

2. Max Characters

Possible that you have to flush the cache ( php/magento cache:flush ) and re-index everything ( php/magento indexer:reindex ) to see the results.

Category “Default Category/abc/def/” has not been created. URL key for specified store already exists in Magento2

A new day, a new problem. While importing new products in Magento 2.1.2 via System > Data Transfer > Import something was causing the following error message.

The CSV file was 100% correct, which was making it difficult to figure out why it is causing the error. I ran few more test imports and noticed that the main category actually had an empty space at the end, which I believe was causing the whole problem.

Magento2 Category Name Empty Space

The import ran through without any errors after removing the empty space. However, before I also removed all related URL rewrites as follows. Not sure if this was actually necessary.

After that I rebuilt the re-write table with https://github.com/olegkoval/magento2-regenerate_url_rewrites because for some reason the importer didn’t create the rewrite URLs.

After that everything was working as expected.

Change Order, Invoice, Credit Memo or Shipment Number Prefix or Suffix in Magento2

In some cases shop owners have to change their default order number with a custom prefix or suffix. Customising order numbers sounds complicated, but it can be done with only few MySQL queries.

First, backup your database. After that, get a list of meta_id’s and store_id’s with the following query for order numbers only.

The meta_id is pretty much the identifier you need for the next UPDATE query which will add the letter A as a prefix. For example: A100000001

The same query can be used to change the suffix. Also, you can change the prefix or suffix for any entity_type such as invoice, creditmemo or shipment.

That’s it. Create a new order to see the results.

Create Static Block via SQL Queries in Magento2

Today I had to create a static block quickly via SQL queries because for some reason the grid in Content > Blocks didn’t work. First I created the static block itself.

Values for fields creation_time, update_time and is_active are not required because MySQL will add default values.

After that I created the relation between static block and the actual store.

In order to get the correct block_id you simply have to get block_id from the table cms_block.

In my case the block_id of my new static block was 32. That’s it.